Sunday, April 26, 2009

Space Marine Army and Such

Okay.  Been a little bit since the last update.  Mostly because nothing has been going on.  I've been working mostly on building up a new Space Marine army.  Being poor, I'm also attempting to make it for as free as possible.  So the past week or so has been devoted to crafted a Rhino APC out of cardstock.  In case you were unaware, such a thing is an insanely tedious task.  Anyway, another hour or two worth of work and I'll have it assembled.  Just need to paint it after that and repeat another couple times or so and I'll have the vehicle portion of the army taken care of.

Anyway, in events regarding the armour project, I've purchased the extension pipe for the aluminum foundry.    Just need to find a hair dryer with a cool setting/deactivate the heating element in one without a cool setting and the rest is history.  Relating to that, I found some more plaster while cleaning out my garage yesterday.  With that, I'll hopefully have enough to make the mold for my rosarius, as well as remake the mold for the purity seals, which I messed up on my last attempt.

Regarding cleaning the garage, I've gotten rid of a ton of crap in it, so I'll have a nice decent space to work with out there for making the armor/creating terrain.

We've finally hit a nice dry spell after a fair amount of rain, so I'll be heading out to the river in the next day or so to start scavenging some clay from the sediment.

More news to come.

Friday, April 17, 2009

Not Much

Nothing really big going on at the moment.  Just a few minor things here and there:

  • Messed up my purity seal mold.  Loaded it up with plastic and forgot to spray it down first.  Now it's all gummed up.
  • Just a few more patches and I'll have the left forearm portion of the body cast done.  Later this evening, I'm going to have a friend come over and help me cast the torso.
  •  Found a suitable replacement for the plastic.  Someone suggested using those plastic "For Sale" signs that you can get at various hardware stores.  Went out last night and  checked them out myself.  They look like they should do the trick.  I found some fairly large one's for about 7-8 bucks a pop, but I found some slightly smaller ones for about $2.22 at Walmart.  That part of the project is a still pretty long ways away, but it's good to know that it's there.

I have been thinking a little bit about what else I can make should this project be successful.  At some point, I'd like to put together an Imperial Guardsman's uniform, specifically that of a Cadian Shock Trooper.  That probably wouldn't be terribly hard.  Most of it is just a set of olive-drap fatigues accented with some flak armor.  In addition, I'd like to make a set of Battle Sister armor (Not for myself, of course.  Durrr.)  It would be just as interesting as regular Space Marine armor, but with different sorts of accents to it.  But we'll just how this project goes.

Wednesday, April 15, 2009

Sculpt, Mold, Press

So, at the moment I'm on the verge of considering the original plastic idea a complete bust, at least for it's orginally intended purpose.  On the other hand, I think it'll be perfect for making the second part of my purity seals.  Unfortunately, though, this means that the cost of my project is going to go up a little.  But, I may have at least a cheap solution to the problem.  Apparently, those cheap "For Sale", of "Garage Sale" signs they sell at various hardware stores are made out of certain typ eof plastic that might just be perfect for what I'm trying to do.  From my understanding, those are just a couple bucks a sheet, which shouldn't be too bad.  Still, that means I'm not going to be able to control the thickness of the sheets as I had originally hoped I was going to be able to do.  So, I have something of a solution.  Once I have the parts vacu-formed (which will be much further down the line on this project) I'll line the inside of each piece with some fiberglass.  This should make it nice and firm.  Problem being, it's going to take another price hike to accomplish this.

Another price concern is plaster.  It's not monstrously expensive, but I'm going to need a pretty large sum of it for this project.  I'm starting to get a little disappointed at how quickly my prices are going up just a couple of days into the project, but I suppose it was to be expected.  Still, I'm going to try to negate the problem by take as many other monetary short cuts as I can.

So some good news.  I've started work on the second part of my purity seals.  Finally nailed down the design I want to use, and sculpted it out yesterday.  Afterwards, I got the last bit of plaster left in my garage and made me a nice mold.  Used my plastic in it, but like a jerk, I forgot to apply my releasing agent, making it stick to the mold and become worthless.  I'll try again a little later today, hopefully with a bit more success.

Speaking of scuplting, I worked out the design for my Rosarius.  Sculpted it out this morning.  Now I just need to wait until I can get my hands on some more plaster.  In addition, to make this properly, I'm going to have to construct some new equipment.  Fortunately, this will be very much on the cheap.  To make this thing right, it's going to need to be made of metal.  As such, I'm going to be constructing an aluminum foundry.  I was really excited to find that I can get most of the parts for this completely free, since it's mostly just made out of trash.

Eventually, I'll get to posting the pictures of everything I've discussed.  My camera is a smidge more than a decade old and has next to no battery life anymore, making it really difficult to get pictures when I need them.

Tuesday, April 14, 2009

Plastic, Paper and Pennies 2: Electric Boogaloo

Okay, so I've got those pictures for the various steps here:

1. Place your strips in the coffee.

Photobucket

2. Place pennies on the ends of the strips to keep them at the bottom.  After a couple hours, flip the strips over.

Photobucket

3. I didn't get a picture of my tearing the actual seals, so here's just a random strip of paper.  After your strips are dry (either by letting them sit out or by hair dryer), make tiny little tears along the edges.

Photobucket

4. Rip up the bottom of the seal.

Photobucket

5. Crumple into a ball.  Roll it around in your hands.  Get it good and wrinkled.  You're done when all the stiffness is lost from the strip.  It'll seem to have an almost cloth-like feel to it.

Photobucket

6. And you're done.

Photobucket

Photobucket

I'm currently working on making the wax seal portion.  As I said, I'll post that as soon as I'm done with it.

****

Regarding the plastic that I'm attempting to use, I'm starting to have some doubts.  It's too bubbly and inconsistent at the moment.  Anyway, I'm going to try and give it a little more time to prove that it's actually useful, but in the meantime I'm coming up with some alternate courses of action.

Monday, April 13, 2009

Plastic, Paper and Pennies

Okay, so I've got several different parts of this project going on at once here.  Just in general, there's a lot of waiting in between construction times.  I started on the "pre-cast" the other night.  I'll post more about that once I finish getting the rest of the supplies.

Regarding one of the most important parts of this endeavor, I've started collecting the plastic that the armor will eventually be made out of.  Buying the actual styrene sheets is fairly expensive considering shipping costs and such, so this was obviously the first thing I had to look into getting around.  It's got a few kinks I'm still trying to work out, but I more or less have my solution.  Instructables is a great place for finding all sorts of guides to doing things you never knew that you wanted to know how to do.  This particular tutorial is a guide on making the precious plastic I need.   As I said, the sheets of plastic are made of polystyrene.  As it turns out, foam cups and those big foam packing blocks are also made out of polystyrene.  As it turns out, if you combine these materials with some acetone, they will break down into a liquid state where they will eventually dry and harden.  Now, thus far, I've noticed two problems.  The most obvious problem being that it takes a lot of foam to make just a little plastic.  Just experimenting, I dropped in about 7 styrofoam cups and only got a small puddle of plastic out of it.  The next problem would be bubbles.  While the plastic is drying, it has a tendency to form lost of tiny little bubbles, which is sort of a problem.  Either way, I'm working on correcting the issue.

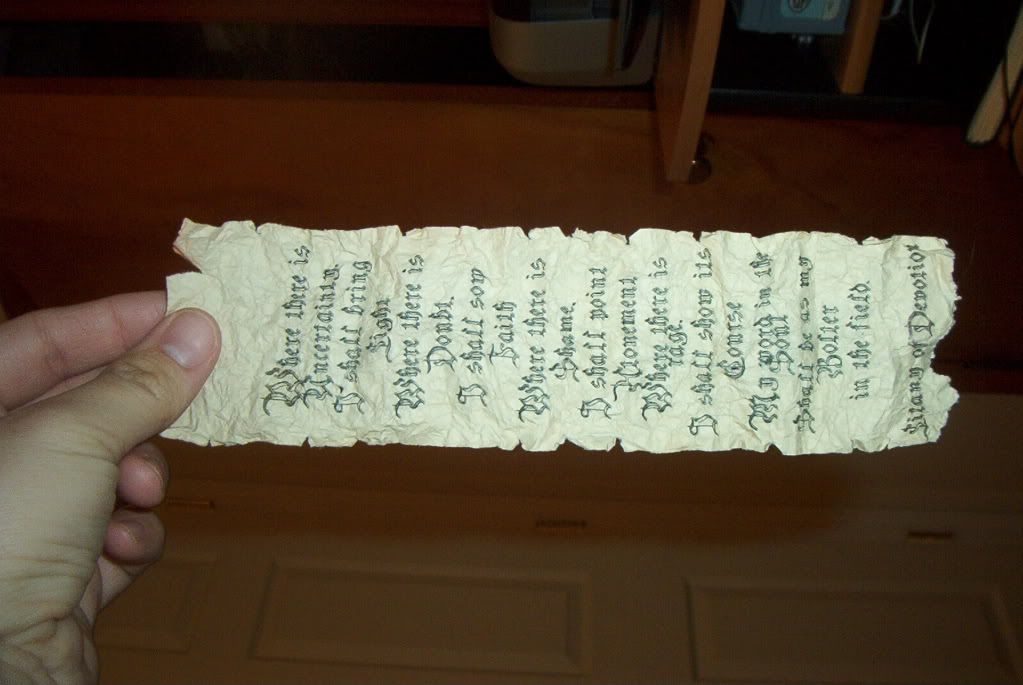
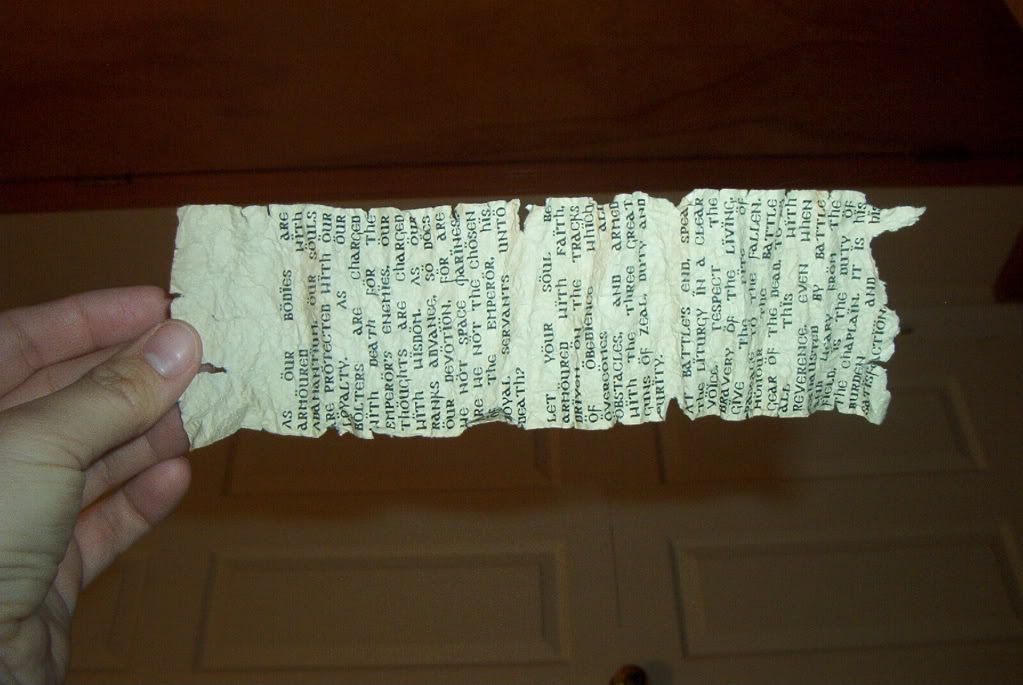
Now, for the fun part.  You can't have Space Marine armor without all the fun little doodads hanging off of it.  Having some time on my hands, I decided to start working on some purity seals.  While the one picture is very nicely done, mine are going to look significantly more weathered.  This is a fun and cheap one to follow along with, so feel free to make your own:

1.  First of all, you're gonna want some approriate text for your seals.  A good place to look for those would be on Lexicanum where there are quite a few Space Marine quotes, dedications, prayers, litanies, etc.

2. After finding some appropriate text, you'll need a suitably gothic or medieval looking font.  Just go here and pick your favorite.

3.  Now you can just as easily use any word processor that allows you to adjust your margins and such, but I prefer to use Scribus to actually set up the text for my seals.  What I did was go into the program, make two text boxes that were two inches wide each, top to bottom in length, and added in my chosen text and font, adjusted the size until it filled up as much of the space as it could and then printed.

4. With your inspiring words printed, cut them out.  I found that it's best to only leave just the tiniest space in between the words and the edge of the paper.  You'll see more clearly what I mean when I post the pictures.

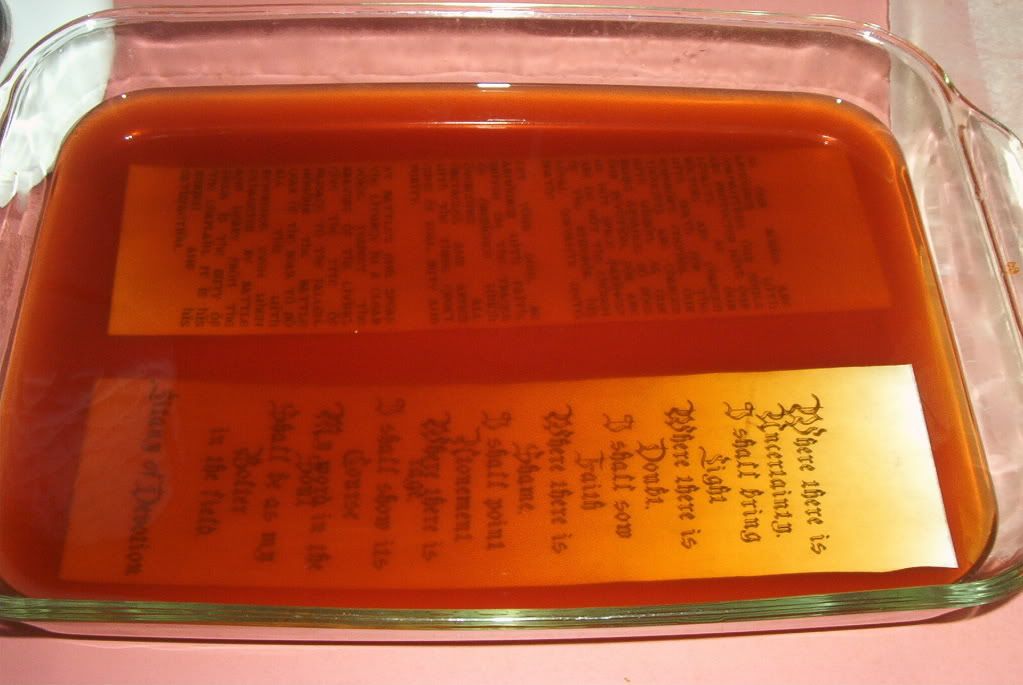
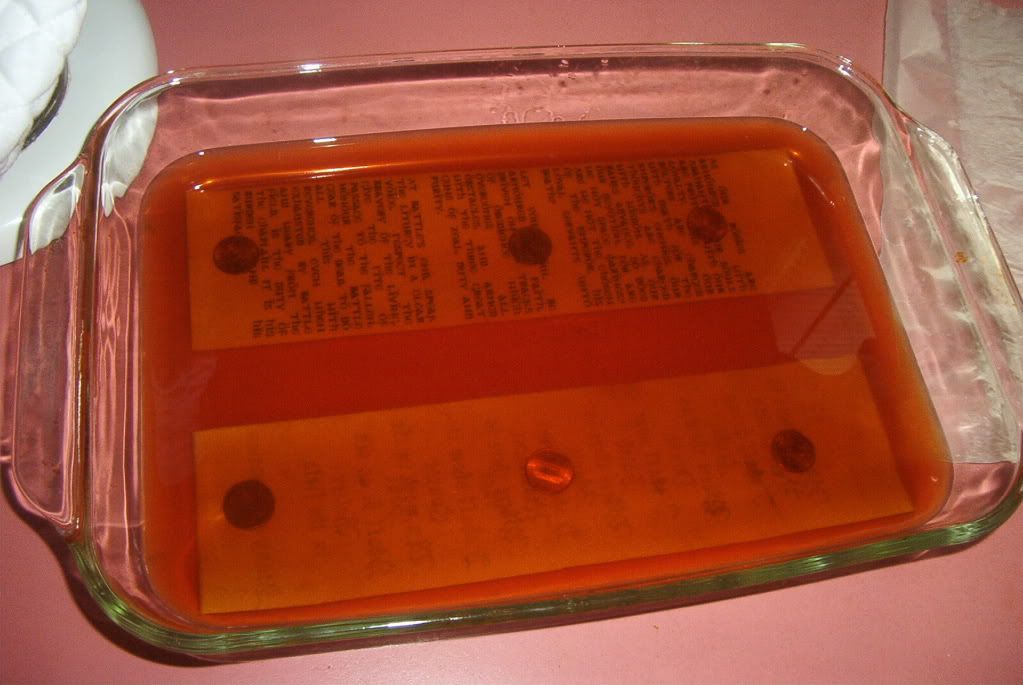
5. Now, you have two strips of paper with some words typed on them.  Now we're gonna add in that look of wear and tear that'll make it look properly cool.  Get a decent sized baking dish or some sort.  Fill it up with coffee or tea.  I prefer coffee.  It's a little darker and will stain better.  Place your seals flat at the bottom of the dish and put a penny at the top and bottom of each one to keep it from floating to the top.  Let them sit for an hour or two.  After that, just flip them over and let them sit for another hour or so.  Really, it's up to you how long you leave them in for, but the longer they stay, the darker they'll be.

6. After they are yellowed to your satisfaction, take them out of the dish and place them on a sheet of wax paper or tin foil or whatever you prefer.  You can now either let them air dry or, if you're impatient like me, use a blow dryer.

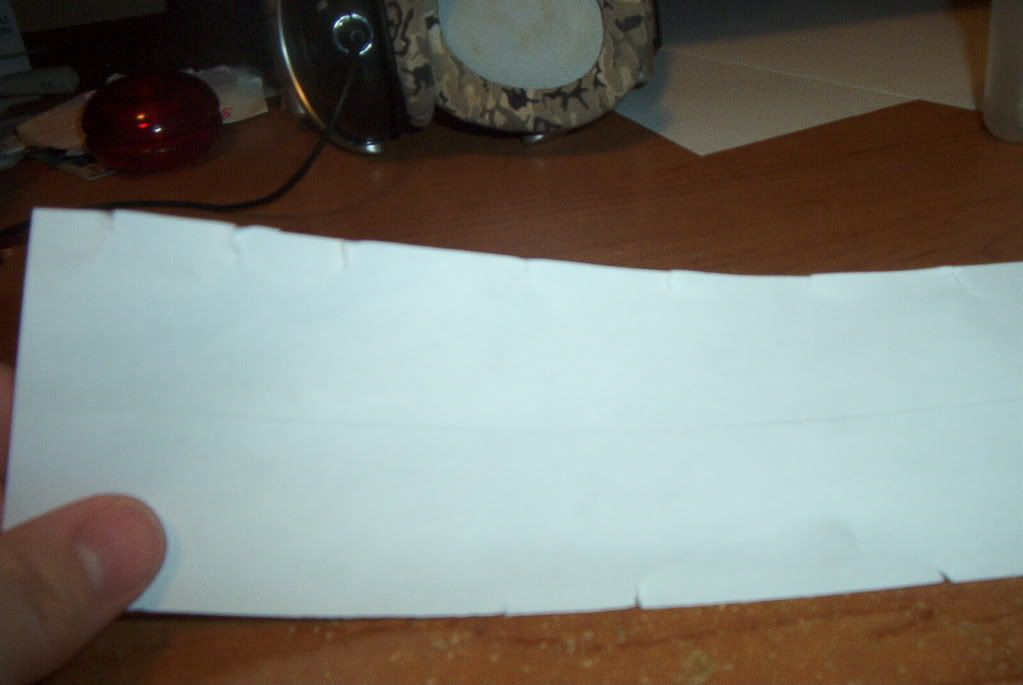
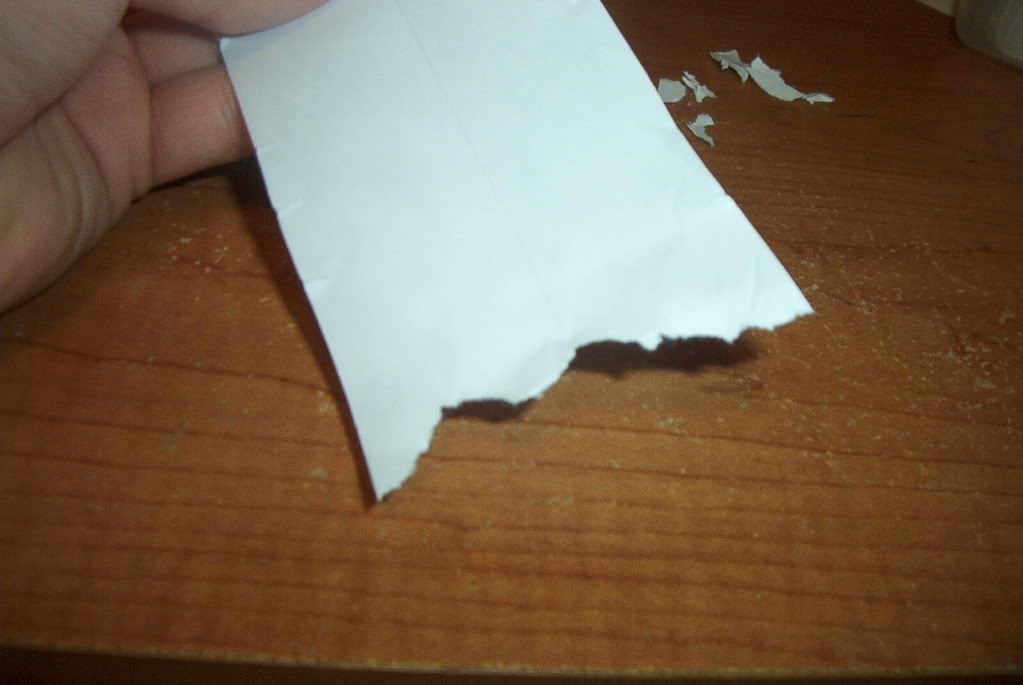
7. Once dry, you can start to "distress" the seal.  This is my favorite part.  Start off by making a number of tiny little tears in the sides of the seal.  Don't make them too big or you may rip up more of the seal then you want to.  Put as many as you want and space them out however you please.  At the bottom of the seal, actually tear out some chunks of the paper.  This'll give the bottom a nice ragged appearence.

8. Finally, after your ripped and torn the paper to your liking, start to crumple it up into a ball.  To give it that really properly old and mistreated look, crumple it and roll it around for a good long while.  Keep doing this until all the stiff is completely taken out of the paper.  When you're done, it should feel more like fabric than paper.  If you've done your tears right, then the whole thing should have a nice dog-earred and ragged look to it.

That done, you have a nice purity seal.  If you're still not satisfied with the yellowing, feel free to put it back in your coffee bath for a while longer, then dry and repeat until you're happy with it.

By the next post I should have some pictures of the process to add.  In addition, I'm going to start working on the actual seal part.  If you want to, you can just do this with some sealing wax and a proper stamp, but I'm going to work on making something a little bit more "Imperial".  I'll post the results of that once I get around to finishing it.  Until then, enjoy.

Sunday, April 12, 2009

For Your Consideration

Okay, so I think I'll start things off with a little further explanation on what I'm specifically attempting to achieve here.

Obviously, my ultimate goal is to create the most finely crafted Space Marine armor for the most modest budget.  But there's a bit more detail to it than that.  Once I am done, I'm hoping to actually take this to various conventions to show it off, so I want to put as much detail into it as possible.  As such, I'm more or less making a character that is going to be reflected in the costume.  This "character" is going to be a Chaplain of the Blood Angels Chapter, wearing Mk. 7 "Eagle Armor" that's been modified to reflect his office.  Now that sounds simple enough (it probably won't once I actually go through what has to be done to construct said armor), but the amount of detail that's going to have to be added on top of the basic armor constructin will be overwhelming.

Things To Be Produced (Armor itself not included):

In addition to the parts I'm making for the costume, I'm going to also have to acquire and construct a number of tools and materials necessary to complete the project:

Tools and Supplies:

  • Fiberglass Resin and Sheets
  • Clay
  • Plaster
  • Styrene Foam
  • Vacu-Forming Table
  • Heat Gun
  • Riveter
  • Velcro
  • Lenses
  • Various Colors of Paint
  • Sealer
  • Lenses
  • Stencils
  • Stuff I Haven't Even Thought of Yet
  • Countless Manhours

Now, as I said, part of the project is going to be finding cost-effective ways of acquiring and constructing these materials.  I may possibly fail in some or all of these aspects.  I'm hoping no the latter.  That would make this a very short-lived project.

Anyway, there really is no set agenda or schedule regarding when I'm going to work on what, but there are certain factors to take into account.  The armor itself will have to be built in a fairly specific order, but aside from that, the various other items like the purity seals and bolt pistol and such can be done before or after or in the middle of the armor construction.  Regardless, the goal is to constantly be working on something for the project.

I have officially started on the project and I'm taking pictures every step of the way.  If readers are interested in building a set of their own armor, I recommend either following the Bolter and Chainsword Tutorial or waiting until I'm completely done with mine.  Not that I don't want people to follow along, but I'm working using a number of methods that I'm not entirely sure will work and I don't want people sharing my possibly expensive failures.

Stay Tuned.

Friday, April 10, 2009

For The Emperor!

There comes a time in every man's life when he sits down, thinks to himself and comes to the realization that he has nothing better to do with his time than make a full suit of Warhammer 40k Space Marine armor.  This is the chronicle of that struggle:

It started out with this post on The Bolter and the Chainsword.  I sat and sort of marveled at the achievements of the gentlemen who made the set of armor show in the post.  I downloaded their instuctions, looked it up and down and decided that I wanted to make something similar.  Rather than the materials they used, though, I decided I wanted to use a process similar to what was used on this fabulous Storm Trooper armor tutorial.  "Awesome," I thought, "I have a plan!"  But looking at it, I noticed one problem:  this was going to take money, and I have basically none.  Cursing the Heavens, I began to get bummed.  But, a new thought occured to me.  What if I combined my desire for some Space Marine armor with a sort of challenge.  The challenge being finding a way to make the best armor I possible could for as cheap as possible.  This is my mission.